UNIX
Systems Manufacturers originated their markets as workstations, during a
time when they used 32 bit systems and the rest of the PC market was
concentrating on 8 and 16 bit systems, and some CPU vendors like Intel
use segmentation to keep their 16 bit software alive while struggling to
move to 32 bit architectures. Some of the original servers were stacked
workstations on a rack in a cabinet. The former high-powered video
cards were merely ignored, as remote management needed command line
interfaces. Engineering quickly determined that console access needed to
be built into a new class of systems: rack mounted servers. These early
servers offered boot functionality from Network and Disk. One such boot capability was from USB Disk..
Sun Enterprise T5120
The
Sun Enterprise T5120 is a server with a second generation OpenSPARC
processor. It comes with a Lights Out Management (LOM) capability
referred to as Integrated Lights Out Management (ILOM.) The Advanced
Lights Out Management (ALOM) shell may be it's default. Most remote
systems management work can be done from the LOM. The system, when looking at the front of the chassis: the T5120 has 2x USB ports next to the DVD drive on the right and 2x USB ports located in the back left corner.
DVD Drive USB Ports
When a SanDisk USB Flash Sticks are plugged into the USB ports located to the right of the DVD drive, they can be seen at the OpenFirmware prompt, and can be selected into a copy-paste buffer, for easy use.
{0} ok show-disks a) /pci@0/pci@0/pci@8/pci@0/pci@9/SUNW,emlxs@0,1/fp@0,0/disk b) /pci@0/pci@0/pci@8/pci@0/pci@9/SUNW,emlxs@0/fp@0,0/disk c) /pci@0/pci@0/pci@2/scsi@0/disk d) /pci@0/pci@0/pci@1/pci@0/pci@1/pci@0/usb@0,2/hub@4/storage@2/disk e) /pci@0/pci@0/pci@1/pci@0/pci@1/pci@0/usb@0,2/hub@4/storage@1/disk f) /pci@0/pci@0/pci@1/pci@0/pci@1/pci@0/usb@0,2/storage@2/disk g) /iscsi-hba/disk q) NO SELECTION Enter Selection, q to quit: d /pci@0/pci@0/pci@1/pci@0/pci@1/pci@0/usb@0,2/hub@4/storage@2/disk has been selected. Type ^Y ( Control-Y ) to insert it in the command line. e.g. ok nvalias mydev ^Y for creating devalias mydev for /pci@0/pci@0/pci@1/pci@0/pci@1/pci@0/usb@0,2/hub@4/storage@2/disk {0} ok
Note: the USB stick in position "d" (this lettered position may change as new USB sticks are plugged or unplugged) has it's device name copied into a "copy-paste" buffer by selecting "d"
Failed Boot from a USB Stick
It looks like this when one boots from a USB stick with no operating system & boot environment on it:
{0} ok boot ^Y {0} ok boot /pci@0/pci@0/pci@1/pci@0/pci@1/pci@0/usb@0,2/hub@4/storage@2/disk Boot device: /pci@0/pci@0/pci@1/pci@0/pci@1/pci@0/usb@0,2/hub@4/storage@2/disk File and args: The file just loaded does not appear to be executable. {0} ok
Creating a USB Boot Stick
The USB port can be used to create boot environment that the chassis is compatible with or even not compatible with! For example, creating a Solaris 11.4 USB Boot Stick from Solaris 11.3 after inserting a SanDisk USB stick into the front port next to the DVD Drive:
T5120/root# echo | format -e | grep -i SanDisk 4. c7t0d0 <SanDisk'-Cruzer Fit-1.00 cyl 1945 alt 0 hd 255 sec 63> 5. c8t0d0 <SanDisk'-Cruzer Fit-1.00 cyl 1945 alt 0 hd 255 sec 63>
T5120/root# ls -al *usb -rw-r--r-- 1 dh127087 staff 1217341440 May 3 19:38 sol-11_4-text-sparc.usb
T5120/root# time dd bs=16k if=sol-11_4-text-sparc.usb of=/dev/rdsk/c7t0d0s2 74300+1 records in 74300+1 records out
real 8m57.25s user 0m0.47s sys 0m13.99s
T5120/root# echo "par\nprint\n" | format -e c7t0d0 | tail -14 | nawk '$NF!="0" && !/partition/' Total disk cylinders available: 148 + 0 (reserved cylinders)
Part Tag Flag Cylinders Size Blocks 0 unassigned wm 0 - 147 1.13GB (148/0/0) 2377620 2 unassigned wm 0 - 147 1.13GB (148/0/0) 2377620
T5120/root#
This USB stick can now be tested from, from OpenBoot Firmware
Test Boot Solaris 11.4
After shutting down the OS, while on the console port, attempt to boot from 11.4, which is too new:
T5120/root# cd / ; sync ; sync ; init 0
svc.startd: The system is coming down. Please wait. svc.startd: 137 system services are now being stopped. syncing file systems... done Program terminated ChassisSerialNumber BEL07492JB
SPARC Enterprise T5120, No Keyboard Copyright (c) 1998, 2017, Oracle and/or its affiliates. All rights reserved. OpenBoot 4.33.6.h, 16256 MB memory available, Serial #78384094. Ethernet address 0:14:4f:ac:b:de, Host ID: 84ac0bde.
{0} ok show-disks a) /pci@0/pci@0/pci@8/pci@0/pci@9/SUNW,emlxs@0,1/fp@0,0/disk b) /pci@0/pci@0/pci@8/pci@0/pci@9/SUNW,emlxs@0/fp@0,0/disk c) /pci@0/pci@0/pci@2/scsi@0/disk d) /pci@0/pci@0/pci@1/pci@0/pci@1/pci@0/usb@0,2/hub@4/storage@2/disk e) /pci@0/pci@0/pci@1/pci@0/pci@1/pci@0/usb@0,2/hub@4/storage@1/disk f) /pci@0/pci@0/pci@1/pci@0/pci@1/pci@0/usb@0,2/storage@2/disk g) /iscsi-hba/disk q) NO SELECTION Enter Selection, q to quit: d /pci@0/pci@0/pci@1/pci@0/pci@1/pci@0/usb@0,2/hub@4/storage@2/disk has been selected. Type ^Y ( Control-Y ) to insert it in the command line. e.g. ok nvalias mydev ^Y for creating devalias mydev for /pci@0/pci@0/pci@1/pci@0/pci@1/pci@0/usb@0,2/hub@4/storage@2/disk
{0} ok boot ^Y {0} ok boot /pci@0/pci@0/pci@1/pci@0/pci@1/pci@0/usb@0,2/hub@4/storage@2/disk Boot device: /pci@0/pci@0/pci@1/pci@0/pci@1/pci@0/usb@0,2/hub@4/storage@2/disk File and args:
'cpu:SUNW,UltraSPARC-T2:SUNW,sun4v-cpu:sun4v' is not supported by this release of Solaris. Program terminated ChassisSerialNumber BEL07492JB
SPARC Enterprise T5120, No Keyboard Copyright (c) 1998, 2017, Oracle and/or its affiliates. All rights reserved. OpenBoot 4.33.6.h, 16256 MB memory available, Serial #78384094. Ethernet address 0:14:4f:ac:b:de, Host ID: 84ac0bde.
{0} ok
Note: The OpenSPARC T2 processor is not supported by Oracle Solaris 11.4, but Sun Microsystems Solaris 10, OpenSolaris, and Oracle Solaris 11.0 - Solaris 11.3 are all supported on the chassis.
UNIX
Systems Manufacturers originated their markets as workstations, during a
time when they used 32 bit systems and the rest of the PC market was
concentrating on 8 and 16 bit systems, and some CPU vendors like Intel
use segmentation to keep their 16 bit software alive while struggling to
move to 32 bit architectures. Some of the original servers were stacked
workstations on a rack in a cabinet. The former high-powered video
cards were merely ignored, as remote management needed command line
interfaces. Engineering quickly determined that console access needed to
be built into a new class of systems: rack mounted servers. These early
servers offered boot functionality from Network and Disk. One such boot capability was from USB Disk.This capability was later carried onto other chassis that Oracle would manufacture, such as the SPARC T4-4.
Creating a USB Boot Stick from Solaris
The
USB port can be used to create a
Solaris 11.4 USB Boot Stick from Solaris, after inserting a SanDisk
USB stick into the front port next to the DVD Drive:
T5120/root# echo | format -e | grep -i SanDisk 4. c7t0d0 <SanDisk'-Cruzer Fit-1.00 cyl 1945 alt 0 hd 255 sec 63> 5. c8t0d0 <SanDisk'-Cruzer Fit-1.00 cyl 1945 alt 0 hd 255 sec 63>
T5120/root# ls -al *usb -rw-r--r-- 1 dh127087 staff 1217341440 May 3 19:38 sol-11_4-text-sparc.usb
T5120/root# time dd bs=16k if=sol-11_4-text-sparc.usb of=/dev/rdsk/c7t0d0s2 74300+1 records in 74300+1 records out
real 8m57.25s user 0m0.47s sys 0m13.99s
T5120/root# echo "par\nprint\n" | format -e c7t0d0 | tail -14 | nawk '$NF!="0" && !/partition/' Total disk cylinders available: 148 + 0 (reserved cylinders)
Part Tag Flag Cylinders Size Blocks 0 unassigned wm 0 - 147 1.13GB (148/0/0) 2377620 2 unassigned wm 0 - 147 1.13GB (148/0/0) 2377620
T5120/root#
This USB stick can now be tested from, from OpenBoot Firmware
Oracle SPARC T4-4
The Oracle SPARC T4-4 is a server with a 4th generation OpenSPARC
processor. The SPARC T4 processor was manufactured to the same process size as the SPARC T3 CPU processor, but the core was upgraded, so equivalent throughput could be reached with half as many cores, at the same processor speed. The T4-4 Chassis comes with a Lights Out Management (LOM) capability
referred to as Integrated Lights Out Management (ILOM.) Most remote
systems management work can be done from the LOM. The system, when
looking at the front of the chassis: the T5120 has 2x USB ports next to
the DVD drive on the right and 2x USB ports located in the back left
corner.
Attaching to the ILOM
The ILOM can be attached to via TCP/IP, if previously configured, or over a serial port.
T5120/user$ ssh root@sun1234-ilom Password:
Oracle(R) Integrated Lights Out Manager Version 3.2.6.8 r128095 Copyright (c) 2018, Oracle and/or its affiliates. All rights reserved. Hostname: ORACLESP-1207BDY075
->
Insert USB Boot
The
USB boot flash stick should be inserted into a powered down chassis, to boot from firmware.
-> show /system power_state actual_power_consumption
/System Properties: power_state = Off actual_power_consumption = 37 watts
Power Up Chassis
After the USB boot stick is inserted, the chassis should be powered up from the ILOM.
-> start /SYS Are you sure you want to start /SYS (y/n)? y Starting /SYS
After the chassis is powered on, once the power usage increases, attach to the console
-> show /system power_state actual_power_consumption
/System Properties: power_state = On actual_power_consumption = 1384 watts
-> start /SP/console Are you sure you want to start /SP/console (y/n)? y
Serial console started. To stop, type #.
{0} ok
Note: If the chassis was recently started, the ability to access a prompt does not really occur until after the actual power consumption rises to an expected level. Note: if the "ok" prompt does not appear, press [RETURN] or [ENTER] key
Select USB Port
When a SanDisk USB Flash Sticks
are plugged into the USB ports located to the right of the DVD drive,
they can be seen at the OpenFirmware prompt, and can be selected into a
copy-paste buffer, for easy use.
{0} ok show-disks a) /reboot-memory@0 b) /pci@700/pci@1/pci@0/pci@0/LSI,sas@0/disk c) /pci@500/pci@1/pci@0/pci@1/pci@0/pci@3/SUNW,emlxs@0,1/fp@0,0/disk d) /pci@500/pci@1/pci@0/pci@1/pci@0/pci@3/SUNW,emlxs@0/fp@0,0/disk e) /pci@400/pci@2/pci@0/pci@1/pci@0/pci@3/SUNW,emlxs@0,1/fp@0,0/disk f) /pci@400/pci@2/pci@0/pci@1/pci@0/pci@3/SUNW,emlxs@0/fp@0,0/disk g) /pci@400/pci@1/pci@0/pci@8/pci@0/usb@0,2/hub@2/hub@3/storage@2/disk h) /pci@400/pci@1/pci@0/pci@8/pci@0/usb@0,2/hub@2/storage@2/disk i) /pci@400/pci@1/pci@0/pci@0/LSI,sas@0/disk j) /iscsi-hba/disk m) MORE SELECTIONS q) NO SELECTION Enter Selection, q to quit: h /pci@400/pci@1/pci@0/pci@8/pci@0/usb@0,2/hub@2/storage@2/disk has been selected. Type ^Y ( Control-Y ) to insert it in the command line. e.g. ok nvalias mydev ^Y for creating devalias mydev for /pci@400/pci@1/pci@0/pci@8/pci@0/usb@0,2/hub@2/storage@2/disk {0} ok
Note:
the USB stick in position "h" (this lettered position may change as new
USB sticks are plugged or unplugged) has it's device name copied into a
"copy-paste" buffer by selecting "h"
Boot Solaris 11.4 from USB
After shutting down the OS, while on the console port, attempt to boot from 11.4, which is too new:
{0} ok boot ^Y {0} ok boot /pci@400/pci@1/pci@0/pci@8/pci@0/usb@0,2/hub@2/storage@2/disk Boot device: /pci@400/pci@1/pci@0/pci@8/pci@0/usb@0,2/hub@2/storage@2/disk File and args: /
Install Solaris 11.4
As the USB boot occurs, the Solaris 11.4 installer begins.
SunOS Release 5.11 Version 11.4.0.15.0 64-bit Copyright (c) 1983, 2018, Oracle and/or its affiliates. All rights reserved. Remounting root read/write Probing for device nodes ... Preparing image for use Done mounting image USB keyboard 1. Arabic 15. Korean 2. Belgian 16. Latin-American 3. Brazilian 17. Norwegian 4. Canadian-Bilingual 18. Portuguese 5. Canadian-French 19. Russian 6. Danish 20. Spanish 7. Dutch 21. Swedish 8. Dvorak 22. Swiss-French 9. Finnish 23. Swiss-German 10. French 24. Traditional-Chinese 11. German 25. TurkishQ 12. Italian 26. UK-English 13. Japanese-type6 27. US-English 14. Japanese To select the keyboard layout, enter a number [default 27]:27
1. Chinese - Simplified 2. Chinese - Traditional 3. English 4. French 5. German 6. Italian 7. Japanese 8. Korean 9. Portuguese - Brazil 10. Spanish To select the language you wish to use, enter a number [default is 3]: 3
User selected: English Configuring devices. Hostname: solaris
Welcome to the Oracle Solaris installation menu
1 Install Oracle Solaris 2 Install Additional Drivers 3 Shell 4 Terminal type (currently xterm) 5 Reboot
Please enter a number [1]: 1
Welcome to Oracle Solaris
Thanks for choosing to install Oracle Solaris! This installer enables you to install the Oracle Solaris Operating System (OS) on SPARC or x86 systems.
The installation log will be at /system/volatile/install_log.
How to navigate through this installer: - Use the function keys listed at the bottom of each screen to move from screen to screen and to perform other operations. - Use the up/down arrow keys to change the selection or to move between input fields. - If your keyboard does not have function keys, or they do not respond, press ESC; the legend at the bottom of the screen will change to show the ESC keys for navigation and other functions.
F2_Continue F6_Help F9_Quit
Discovery Selection
Select discovery method for disks
Local Disks Discover local disks
iSCSI Discover iSCSI LUNs
F2_Continue F3_Back F6_Help F9_Quit
Disks
Where should Oracle Solaris be installed? Minimum size: 4.1GB Recommended minimum: 6.1GB
Type Size(GB) Boot Device ---------------------------------------------------------------------- scsi 279.4 + SYS/MB/HDD4 HITACHI scsi 279.4 SYS/MB/HDD0 HITACHI usb 1.1 c2t0d0 SanDisk' <
Enter a name for this computer that identifies it on the network. It can contain letters, numbers, periods (.) and minus signs (-). The name must start and end with an alphanumeric character and must contain at least one non-digit character.
Select how the network interface should be configured.
DHCP Allow DHCP to configure the interface
Static Configure the interface with a static IP address
F2_Continue F3_Back F6_Help F9_Quit
Time Zone: Regions
Select the region that contains your time zone.
Regions ---------------------------------------- UTC/GMT Africa Americas Antarctica Asia Atlantic Ocean Australia Europe Indian Ocean Pacific Ocean
F2_Continue F3_Back F6_Help F9_Quit
Locale: Language
Select the default language support and locale specific data format. These selections determine the language support, the default date and time, and other data formats. The language chosen automatically determines the available territories.
Language ---------------------------------------- No Default Language Support Chinese English French German Italian Japanese Korean Portuguese Spanish
F2_Continue F3_Back F6_Help F9_Quit
Locale: Territory
Select the language territory
Territory ---------------------------------------- United States (en_US.ISO8859-1) United States (en_US.ISO8859-15) United States (en_US.ISO8859-15@euro) United States (en_US.UTF-8)
F2_Continue F3_Back F6_Help F9_Quit
Date and Time
Edit the date and time as necessary. Time shown is the system clock time in UTC and will be interpreted as such on installation. The time is in 24 hour format.
^ German | Italian | Japanese-type6 | Japanese | Korean | Latin-American | Norwegian | Portuguese | Russian | Spanish | Swedish | Swiss-French | Swiss-German | Traditional-Chinese | TurkishQ | UK-English - US-English
F2_Continue F3_Back F6_Help F9_Quit
Users
Define a root password for the system and user account for yourself.
System Root Password (required)
Root password: solar1s Confirm password: solar1s
Create a user account (optional)
Your real name: Username: User password: Confirm password:
F2_Continue F3_Back F6_Help F9_Quit
Support - Registration
Provide your My Oracle Support credentials to be informed of security issues, enable Oracle Auto Service Requests.
See http://www.oracle.com/goto/solarisautoreg for details.
Email: anonymous@oracle.com Easier for you if you use your My Oracle Support email address/username.
Please enter your password if you wish to receive security updates via My Oracle Support.
My Oracle Support password:
F2_Continue F3_Back F6_Help F9_Quit
Installation Summary
Review the settings below before installing. Go back (F3) to make changes.
- Software: Oracle Solaris 11.4 SPARC | | Root Pool Disk: 279.4GB scsi | | Computer name: solaris | | Network: | DHCP Configuration: net6/v4 | | Time Zone: UTC | Locale: | Default Language: English | Language Support: English (United States) | Keyboard: US-English | No user account | v Support configuration:
F2_Install F3_Back F6_Help F9_Quit
Installing Oracle Solaris
Preparing for Installation
[ (4%) ]
F9_Quit
Installation Complete
The installation of Oracle Solaris has completed successfully.
Reboot to start the newly installed software or Quit if you wish to perform additional tasks before rebooting.
The installation log is available at /system/volatile/install_log. After reboot it can be found at /var/log/install/install_log.
F4_View Log F7_Halt F8_Reboot F9_Quit
May 22 06:22:23 solaris reboot: initiated by root
Welcome to the Oracle Solaris installation menu
1 Install Oracle Solaris 2 Install Additional Drivers 3 Shell 4 Terminal type (currently xterm) 5 Reboot
Please enter a number [1]: syncing file systems... done rebooting... Resetting...
SPARC T4-4, No Keyboard Copyright (c) 1998, 2018, Oracle and/or its affiliates. All rights reserved. OpenBoot 4.38.16, 1023.5000 GB memory available, Serial #99743488. Ethernet address 0:21:28:f1:f7:0, Host ID: 85f1f700.
Boot device: /pci@400/pci@1/pci@0/pci@0/LSI,sas@0/disk@w5000cca0252bf86d,0:a File and args:
/
SunOS Release 5.11 Version 11.4.0.15.0 64-bit Copyright (c) 1983, 2018, Oracle and/or its affiliates. All rights reserved.
Loading smf(7) service descriptions: 238/238 Booting to milestone "svc:/milestone/config:default".
Configuring devices. Loading smf(7) service descriptions: 2/2 Booting to milestone "all".
Hostname: solaris May 22 06:35:06 solaris sendmail[1502]: My unqualified host name (solaris) unknown; sleeping for retry May 22 06:35:06 solaris sendmail[1507]: My unqualified host name (solaris) unknown; sleeping for retry
solaris console login:
UnConfigure / Configure
Solaris 10, offered an option to perform a "sys-unconfig", to restore an OS back to factory settings. In Solaris 11, this has been replaced with another option called "sysconfig configure -s" or "sysconfig configure -s --destructive" to destroy the initial user home account to also be destroyed.
This option is good if moving a chassis to a different location.
Abstract:
Solaris 10 was launched in 2005, with ground-breaking features like: DTrace, SMF (Services), Zones, LDom's, and later ZFS. The latest, and perhaps last, update of Solaris 10 was expected in 2012, to co-inside with an early release of the SPARC T5. In 2013, Oracle released yet another update, suggesting the T5 is close to release. The latest installment of Solaris 10 is referred to as 01/13 release, for January 2013, appears to be the final SVR4 Solaris release, with expected normal Oracle support extending to 2018. Many serious administrators will refer to this release as Solaris 10 Update 11.
(Oracle SPARC & Solaris Road Map, 2013-02-11)
What's New?
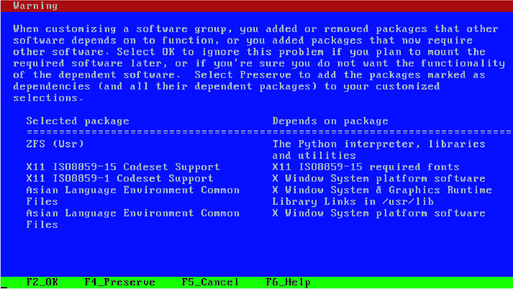
Oracle released the "Oracle Solaris 10 1/13 What's New" document, outlining some of the included features. The arrangement of the categories seems odd, in some cases, so a few were merged/re-orded below. Some of the interesting features include:
(Solaris 10 Update 11 Network File System Install Media Option)
Administration Enhancements OCM (Oracle Configuration Manager) Client Service
Oracle Zones Pre-Flight Checker
SVR4 pkgdep (Package Depends) Command
Intel x86 FMA (Fault Management Architecture) Sandy Bridge EP Enhancements
AMD MCA (Machine Check Architecture) Support for Family 15h, 0Fh, 10h
# zfs help
The following commands are supported:
allow       clone       create      destroy     diff        get
groupspace  help        hold        holds       inherit     list
mount       promote     receive     release     rename      rollback
send        set         share       snapshot    unallow     unmount
unshare     upgrade     userspace
(Solaris 10 Update 10 zfs help system enhancements)
# zpool help
The following commands are supported:
add      attach   clear    create   destroy  detach   export   get
help     history  import   iostat   list     offline  online   remove
replace  scrub    set      split    status   upgrade
# zfs help create
usage:
             create [-p] [-o property=value] ...
             create [-ps] [-b blocksize] [-o property=value] ... -V
(Solaris 10 Update 10 zpool help system enhancements)
ZFS File System and Storage Enhancements
Help tiered into sub-commands for: zfs, zpool
ZFS aclmode enhancements
ZFS diff enhancements
ZFS snap alias for snapshot
Intel x86 SATA (Serial ATA) support for ATA Pass-Through Commands AMD x86 XOP and FMA Support
SPARC T4 CRC32c Acceleration for iSCSI Xen XDF (Virtual Block Device Driver) for x86 Oracle VM
New and Updated Device Drivers
Broadcom BNXE (BCM57712 NetXtreme II 10 Gigabit Ethernet) Driver new support
Intel SR-IOV (Single Root I/O Virtualization) support for i350 Gigabit and x540 10 Gigabit
Sun Blade 6000 Virtualized 40 GbE NEM (Network Express Module) USB 3.0 Support (Block File Throughput: 150MBps Intel/AMD; 50MBps SPARC)
Competitive Pressures:
Competition makes the Operating System market healthy! Let's look at the competitive landscape.
(Illumos Logo)
Solaris USB 3.0 is in a better support position than Illumos still missing USB 3.0 today since Solaris 10, Solaris 11, and Illumos all have top-of-the-line read and write flash accelerators for hard disk storage... a USB 3.0 flash cache will provide a nice inexpensive performance boost! Slower Solaris USB 3.0 support from 2013q1 on SPARC will be shunned with Solaris ZFS SMB's considering Apple MacOSX. Apple released USB 3.0 support in 2012q4 with Fusion Drive, making OSX a strong contender. Apple may have been late to Flash when proper licensing could not be agreed between Sun/Oracle and Apple, Apple is still late with deduplication, but now Oracle and Illumos are late with USB 3.0 to combine with ZFS.
(Lustre logo, courtesy hpcwire)
Sun purchased Lustre, for ZFS integration back in 2007. NetMgmt salivated as Lustre for ZFS was on-tap back in 2009, ZFS needed cluster/replication for a long time. Redhat purchased GlusterFS in 2011 and went beta in 2012, for production quality filesystem clustering. IBM released ZFS and Luster on their own hardware & Linux OS. NetMgt noted Lustre on EMC was hitting in 2012, questioned Oracle's sluggishness, and begged for an Illumos rescue. Even Microsoft "got it" when Windows 2012 bundled: dedupe, clustering, iSCSI, SMB, and NFS. It seems Apple, Oracle, and Illumos are the last major vendors - late with native file system clustering... although Apple is not pretending to play on the Server field.
(Superspeed USB 3.0 logo, courtesy usb3-thunderbolt.com)
The lack of File System Clustering in the final update of Solaris 10 is miserable, especially after various Lustre patches made it into ZFS years ago. Perhaps Oracle is waiting for a Solaris 11 update for clustering??? The lack of focus by Illumos on clustering and USB 3.0 makes me wonder whether or not their core supporters (embedded storage and cloud provider) really understand how big of a hole they have. An embedded storage provider, should would want USB 3.0 for external disks and clustering for geographically dispersed storage their check-list. A cloud provider should would want geographically dispersed clustering, at the least.
(KVM is bundled into Joyent SmartOS, as well as Linux)
Missing native ZFS clustering and hypervisor at Oracle is making Solaris look "long in the tooth". Xen on Oracle Linux with Xen being removed from Solaris is a poor excuse by Oracle. Joyent's SmartOS KVM integrated into Illumos helps the Solaris community move forward, but what is the use of a hypervisor without shared-nothing clustered storage, to migrate those VM's at will? Missing USB 3.0 and native ZFS clustering is putting pressure on Illumos to differentiate itself in the storage market.
Conclusions:
Oracle Solaris 10 is alive and well - GO GET Update 11!!! Some of the most important features include the enhancements to CPU architecture (is SPARC T5 silently supported, since T5 has been in-test since end of 2013?), USB 3.0, iSCSI support for root disk installations, install SVR4 package dependency support, and NFS media support. Many of these features will be welcomed by SMB's (small to medium sized businesses.)
(Bullet Train, courtesy gojapango)
The Solaris Train continues to move at Oracle, producing high quality product, SPARC support, and new drivers (i.e. USB 3.0) - if Solaris 11, Illumos, or SmartOS releases ZFS clustering, the resulting OS will be market leading.
Abstract:
Computing systems do not exist without various interconnect technology. Over time, interconnects went from parallel to serial, always incrementing faster along the way. Toward the modern end of this progression comes Apple/Intel Thunderbolt technology, combining digital video ports with PCI Express, leveraging daisy-channing concepts from FireWire and SCSI.
A Short History of Interconnects:
Computing systems always had some kind of proprietary interconnect, normally originating with a single vendor, but over time, the interconnects started to standardize.
[System Bus Illustration, courtesy Wikipedia]
System Bus Interconnects: Some interconnects would connect cards along a parallel path, often CPU's to memory and I/O peripherals... sometimes from CPU's to CPU's, othertimes specifically for video cards. This is sometimes referred to as a "bus".
[VERSAbus memory card, courtesy Wikipedia]
Initial Motorola (and later cross-vendor compatible) bus connections included: VERSAbus, VME (ANSI/IEEE Std 1014-1987, ANSI/VITA 1-1994), VXI Bus [VME eXtensions for Instrumentation], VPX or VITA46 [VME International Trade Association].
[Two SBus cards, courtesy Wikipedia]
Initial Open Systems SPARC bus connections included: SBus (IEEE-1496), MBus (document), XBus, KBus, UPA (Ultra Port Architecture.)
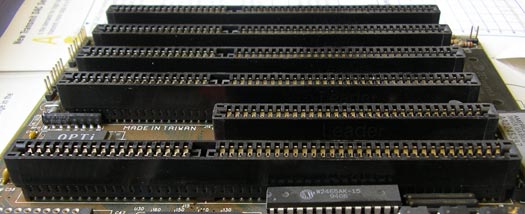
[5x 16 bit and 1x 8 bit ISA card slots, courtesy Wikipedia]
Intitial open and proprietary Intel bus connections included: S-100 (or Altair bus, IEEE696-1983), ISA (IBM PC/XT 8 bit, IBM PC/AT 16 bit), EISA (32 bit Intel based bus), MCA (proprietary 16 bit or 32 bit bus), VLB (VESA Local Bus), AGP (Accelerated Graphics Port), PCMCIA (Personal Computer Memory Card International Association, Type I-IV), PCMCIA 2.0 (PC Card), PCMCIA 5.0 (CardBus), ExpressCard.
[3x PCI Bus Slots, courtesy Wikipedia]
Later industry cross-platform standards included: PCI (Peripheral Component Interconnect), PCI-X [PCI eXtended], PCIe (PCI Express),
[Televideo Terminal, courtesy Wikipedia]
Human Interface Interconnects:
Human interfaces have typically been serial for low speed and parallel for high-speed applications, with a movement toward analog for high speed applications and back to serial again for display outut. Terminals were initially just keyboards, where the keyboard attached via a parallel connector and the output converted to serial for long transmission. Display output was driven typically through parallel printers (or serial printers for longer runs.)
[5 pin DIN, courtesy Wikipedia]
Human interfaces moved towards integrated terminals, where serial (RS232) connections attached to an integrated keyboard and video display unit. The serial port of choice for many devices became the ubiquitous DIN connector - covering applications such as Cassette & Disk Drives (Commodore Vic-20, 64, etc.); keyboards (IBM PC, XT, AT, etc.); Cassette, Joystick, and Modem/Printer ports (TRS-80 Color Computer, Color Computer 2, Color Computer 3, etc.) While DIN was firmly established, new devices like the Mouse would use standard DB-25 or later DE-9 pin serial and later keyboard and and mouse serial interfaces (IBM PS/2) used smaller DIN-like form factor. The video display units used analog connections internally or externally. Keyboard which were integrated typically used a parallel connection, but needed a parallel-to-serial converter when broken into a separate discrete part. Printers could be driven from the terminal or the computer less locally via slower serial or (more locally via higher-speed Centronics parallel printer ports. The parallel ports were also used, with SASI/SCSI protocols, for accessing later external removable disk & tape media (Zip, Jaz, CD-ROM, Tape, etc.) drives.
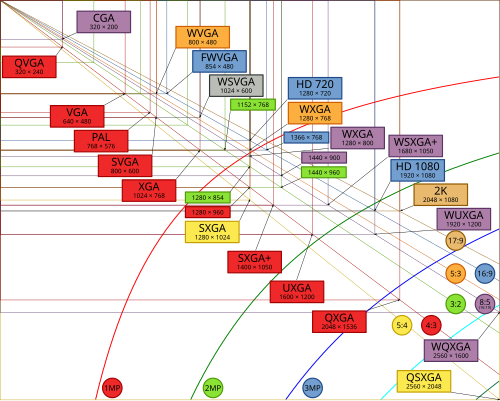
[Some video display types, courtesy Wikipedia]
As video interfaces moved towards external monitors, various analog and digital interfaces were developed: RF, Composite (analog), 9 Pin Digital, CGA [Color Graphics Adapter], EGA [Enghanced Graphics Adapter], VGA [Video Graphics Array] (analog) and other derivatives (XGA, SVGA, etc.), DVI [Digital Visual Interface] (digital and analog), HDMI (digital only), DisplayPort (digital only).
[Sun Workstation, courtesy Wikipedia]
Storage Interconnects:
The Terminal continued to grow in functionality and capabilities, until they turned into hobby personal computers, business computers, scientific workstations, and later, ironically, back into thin clients with graphical processing power (X Terminals), and even thinner clients with merely acting as a audio-video multiplexer (SunRay.) This created an ever needing expansion in communication technologies for interconnects. Long term storage was done against punch cards (printers without ink), tape, solid state cartridges, rotating disks, with a movement back to solid-state in more recent time.
[SCSI Logo, courtesy Wikipedia]
Communication to storage was done via serial, parallel for speed, and back to serial via technologies such as, SASI [Shugart Associates System Interface], ST-506, ST-412, ESDI [Enhanced Small Disk Interface], SCSI [Small Computer Systems Interface] of various parallel bus widths for intelligent controllers, AT Attachment (aka IDE [Integrated Drive Electronics] & Parallel ATA) for consumer grade usage, FibreChannel, SAS [Serially Attached SCSI] for enterprise/industrial grade usage, SATA [Serially attached ATA] (with derivatives such as eSATA) for consumer grade equipment.
SAS was unusual in that it also offered backwards-compatibility with dumber SATA devices, so enterprise-grade controllers could take advantage of consumer-grade higher capacity (but lower quality) storage drives.
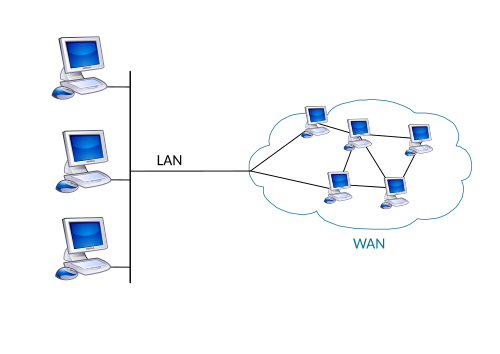
[Host based computer network, courtesy Wikipedia]
Network Interconnects:
The business computer eclipsed the personal computer and scientific workstation markets, with specialization occurring on Gaming Consoles, integrated Smart Phones (Blackberry, iPhone, etc.), and Tablets (Kindle, iPad, etc.) This process drove the need for many new communications modes and protocols - but nearly all of them centered upon the drive from parallel-type communication. These network interconnects, local or wide area in nature, were nearly universally serial.
WAN [Wide Area Network] technologies included technologies such as: modems over analog POTS [Plain Old Telephone Service) voice quality lines, X.25http://en.wikipedia.org/wiki/X.25, ISDN [Integrated Services Digital Network] in the form of BRI [Basic Rate Interface], PRI [Primary Rate Interchange], B-ISDN [Broadband ISDN], DS-0/E-0, DS-1/T1, DS-3/T3, E1-4, ATM [Asynchronous Transfer Mode], PDM [Plesiochronous Digital Hierarchy], SONET [Synchronous Optical Networking] (including: OC-1, OC-3, OC-12, OC-48, etc.), SDM [Synchronous Digital Hierarchy].
With the advent of cellular phones, wireless communications grew in popularity, both for WAN and LAN usage. Various WAN technologies included: 1G (1st Generation), 2G (including 2.5G, 2.75G, 2.9G, etc.), 3G (including 3.5G and 3.75G, etc.), 4G (including WiMAX and LTE [Long Term Evolution].) Various LAN technologies included: WiFi (802.11b, 802.11a, 802.11g, 802.11n, etc.) and WiGig (802.11ad).
[Firewire Logo, courtesy Wikipedia]
Common Peripheral Interconnects:
Gradually, the communication to storage devices, printers, and human interface devices merged. There was 2 classes of standard interfaces: low-speed dumb interfaces at a lower price-point and high-speed smart interfaces at a higher price-point.
[USB Connector, courtesy Wikipedia]
USB (USB 1.1, 2.0, 3.0, etc.) appeared for lower speed applications (12 mbit/s, 480 mbit/s, 5000 mbit/s) where performance and quality of service were not as important. USB remained a master-slave relationship, where the main computer system was loaded with processing load, sometimes affecting quality of service, but significantly reduced costs. Devices would be added through a hub, where speed would be cut in half each time a ^2 factor of devices was hit.
FireWire (IEEE-1394a, IEEE-1394b, iLink, etc.) appeared for higher bandwidth (400 Mbits, 800 Mbit/s, 1.6 Gbit/s, 3.2 Gbit/s, 6.4 Gbit/s) and performance applications such as storage, video camera controlling connectivity HDTV video recording from cable boxes, high speed scanner connectivity, etc. FireWire was designed as a peer-to-peer protocol, where multiple initiators can be on the same network, devices could be daisy-chained for simple wiring, processing was offloaded from the main computer system... this increased cost but also providing consistent performance across many applications.
Next Generation Interconnects:
Newer generation interconnects consolidate additional functionality such as Infiniband and Thunderbolt.
[6x InfiniBand Ports, courtesy Wikipedia]
Infiniband was suggested to be a possible replacement for PCI, FibreChannel, and Ethernet. Various systems vendors, such as Sun Microsystems (now Oracle), moved to InfiniBand to gain superior performance in HPC [High Performance Computing] clustering and now integrated systems (i.e. Exadata, Exalogic, SPARC SuperCluster, etc.)
[Apple MacBook Pro Ethernet, Firewire 800, Thunderbolt, and USB ports, courtesy Wikipedia]
Thunderbolt, developed by Intel in collaboration with Apple Computers, was designed initially as an optical system, named Light Peak. When released through Apple, Thunderbolt used a digital DisplayPort copper connection.
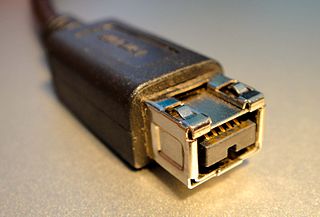
[Thunderbolt Cable with microprocessor in the connector, coutesy TechWorld]
Description
Thunderbold combines some of the best features of SCSI, FireWire, and DisplayPort: Daisy chaining of SCSI, Serial of Firewire, and Digital Video of Mini DP [Mini DisplayPort]. In many ways, Thunderbolt continues in the spirit of SAS, where backwards-compatibility to an existing connection standard (in this case, Mini DisplayPort) was leveraged.
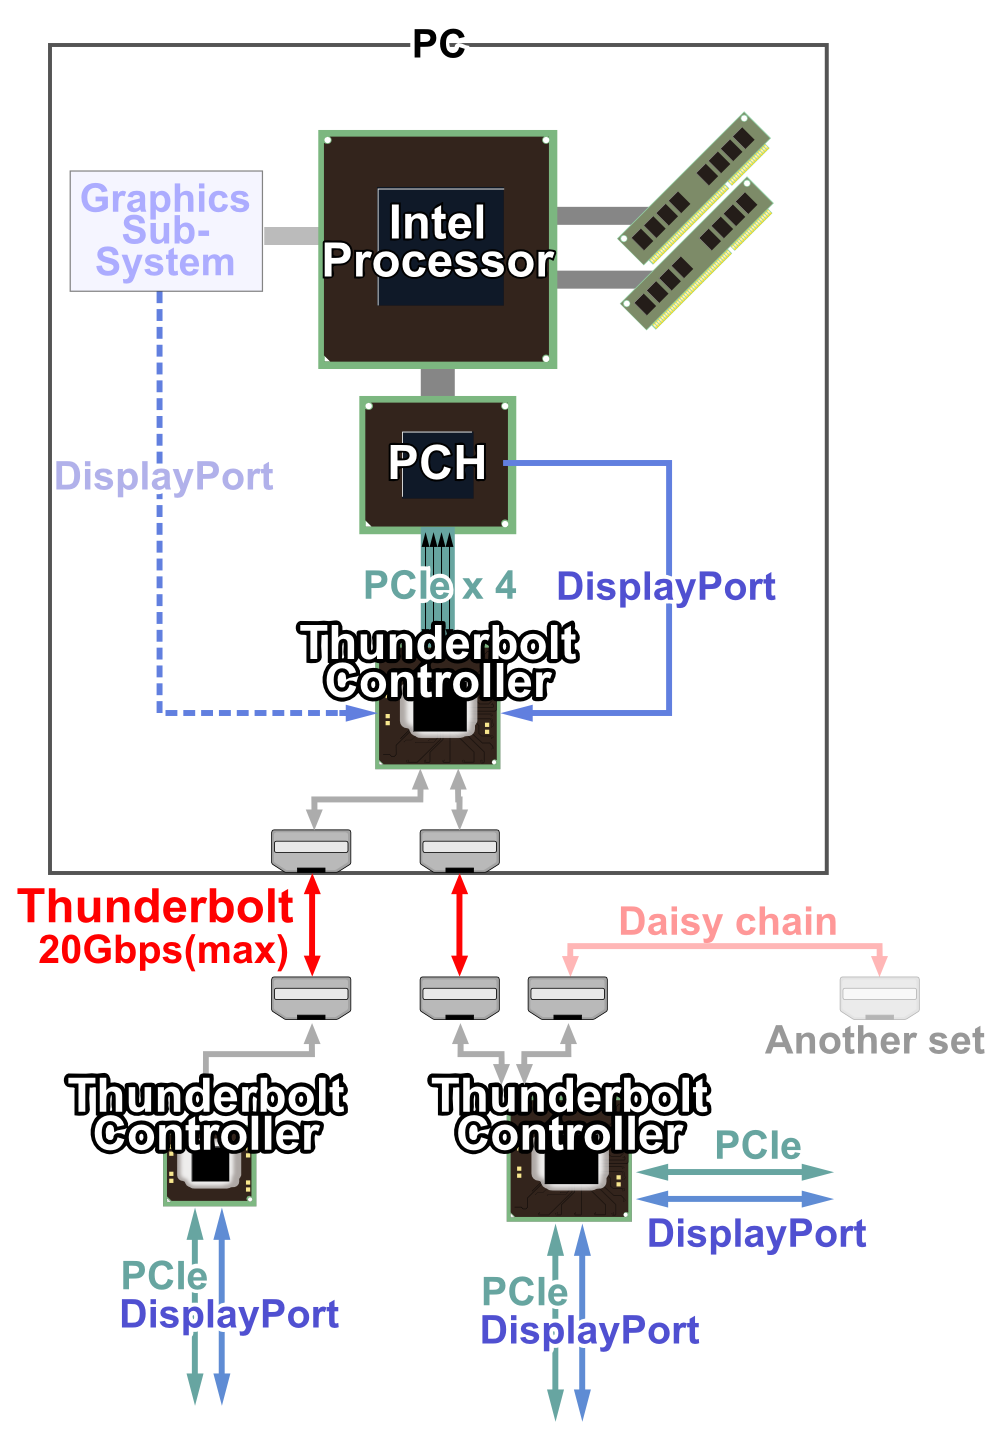
Perhaps the best description of Thunderbolt can be found on Wikipedia:
Thunderbolt combines PCI Express (PCIe) and DisplayPort (DP) into a serial data interface that can be carried over a single cable. Thunderbolt controller chips multiplex data lanes from these two sources for transmission via a duplex Thunderbolt lane then de-multiplex them for consumption from receiver chips. A single Thunderbolt port supports hubs as well as a daisy chain of up to six Thunderbolt devices; as many of these as the host has DP sources may be Thunderbolt monitors.
[Thunderbolt vs Mini DP comparison, courtesy CNet]
Thunderbolt to Mini DP
The Mini Display Port will attach directly into an existing Thunderbolt port, with no change. It will also connect to the last device of a Thunderbolt daisy-chain. Unfortunately, these legacy Mini DP devices will not be able to daisy-chain additional Thunderbolt devices from them, but at least the former purchase can still be leveraged. CNet published an article nearly 2 years back, warning of possible future confusion - but the backward compatibility is welcome by most.
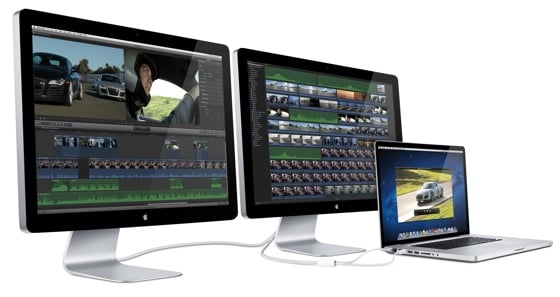
[Apple Thunderbolt Monitor, courtesy The Register]
Thunderbolt to Apple Thunderbolt Monitor
In December 2011, Apple released a 27" Thunderbolt Display, which included a MacBook power connector, thunderbolt connector, and additional ports on the monitor. The monitor included: firewire 800, USB 2.0, Gigabit Ethernet, as well as an additional Thunderbolt daisy-chain port. Adding an old Display Port monitor, additional Thunderbolt monitor, or additional Thunderbold devices should be just fine - but be aware the USB 3.0 ports must be native on the Mac or additionally added through various ways described below in this article.
[Apple's $30 Thunderbolt to FireWire 800, courtesy CNet]
Thunderbolt to FireWire 800
CNet published an article clarifying the use of the Apple Thunderbolt to FireWire 800 cable. As one would expect, using this inexpensive cable, FireWire can be added to a Thunderbolt port or to the end of a Thunderbolt daisy-chain. One would expect that multiple FireWire drives can be chained to the end of this adapter, although the article does not discuss this.
[Apple's $30 Thunderbolt to Gigabit Ethernet Adapter, courtesy ARS Technica]
Thunderbolt to Gigabit Ethernet ARS Technica published an article on Apple's Thunderbolt to Ethernet interface. Of course, you can't attach a Thunderbolt accessory and control it over Gigabit Ethernet. Also missing is a way to daisy-chain Thunderbolt interfaces, so this should be the last in your chain. On the positive side, this adapter will get close to the theoretical throughput of 1 Gigabit!
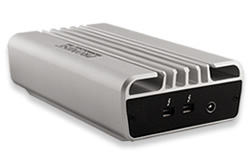
[Promise SANLink Thunderbolt to 4GB FibreChannel, courtesy Promise]
Promise SANLink
Promise released the Thunderbolt to FibreChannel 4 Gbit/secl adapter box. This ~$1000 box is available through the Apple Store and will offer portable Macintosh access to SAN storage.
ATTO Technology ThunderLink NS 1101
ATTO released a Dual Thunderbolt to 10 Gigabit Ethernet adapter box. Yes, this means you can daisy-chain the box to another, a saturated 10 GigE adapter will saturate half of the Thunderbolt bandwidth. Driver support is available.
[ATTO ThunderLink NT 1102 (10GBASE-T), Courtesy ATTO Technologies]
ATTO ThunderLink NT 1102 (10GBASE-T)
ATTO released a Dual Thunderbolt to Dual 10 Gigabit Ethernet adapter box. Yes, this means you can daisy-chain the box to another. With two 10 Gigabit Ethernet ports, two saturated 10 GigE adapters will saturate an entire Thunderbolt port's bandwidth. Driver support is available.
[ATTO ThunderLink SH 1068, Courtesy ATTO Technologies]
ATTO Technology ThunderLink SH 1068
ATTO released a Dual Thunderbolt to Dual 6 Gbit SAS/SATA adapter box. Yes, this means you can daisy-chain the box to another! With dual SAS (Serial Attached SCSI) interfaces, robust storage is finally available... with the option of cheap/unreliable (yet roomy) SATA (Serial ATA) storage . Driver support is available.
[ATTO ThunderLink FC 1082 8Gb/s FC, Courtesy ATTO Technologies]
ATTO Technology ThunderLink FC 1082
ATTO released a Dual Thunderbolt to Dual 8Gb/sec FibreChannel adapter box. Yes, this means you can daisy-chain the box to another! Dual saturated 8 Gbit FC adapters will nearly saturate Thunderbolt bandwidth. Driver support is available.
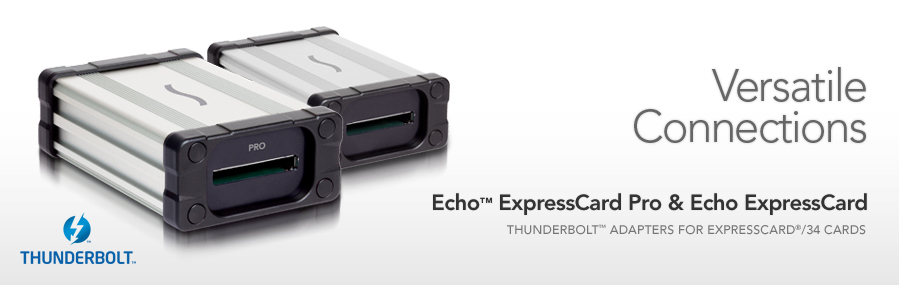
Sonnet Thunderbolt to ExpressCard
Thunderbolt PCIe comptability means simple connections from Thunderbolt to external ExpressCard bus can be created. For laptops without enough ports (i.e. USB 3.0) - ExpressCards can easily be added through daisy-chaining via Thunderbolt. Sonnet is one such Thunderbolt to ExpressCard vendor.
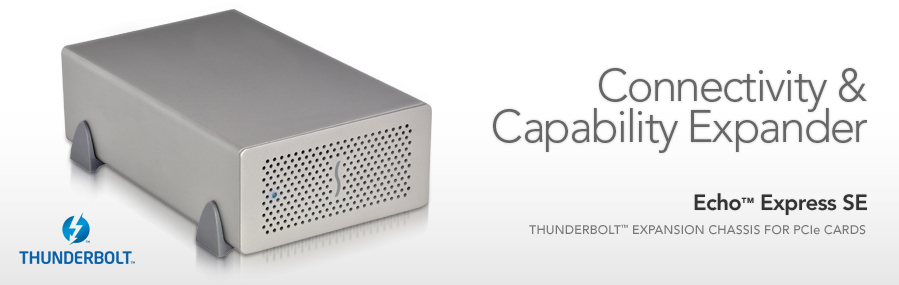
Sonnet Thunderbolt to PCIe [PCI Express]
If one wants to work with a portable form-factor but has a need for PCIe [PCI Express] peripherals occasionally in an office, Thunderbolt offers the user such an option. Adding more PCIe cards needed for an existing desktop chassis is also possible. Sonnet is one vendor offering Thunderbolt to PCIe expansions.
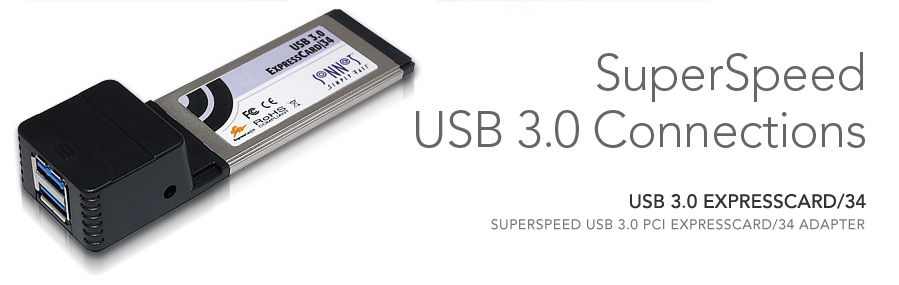
Sonnet ExpressCard to USB 3.0
Using the ExpressCard to Thunderbolt, USB 3.0 ports can be easy added to portable systems, providing professional capabilities of larger systems. Sonnet is one such USB 3.0 ExpressCard vendor. Sonnet also offers other ExpressCards such as FireWire, Ethernet, Memory Cards, etc. that can be added through daisey-chaining another Thunderbolt external ExpressCard chassis.
Sonnet ExpressCard to Memory Card
Modern day SDHC Class 10 memory cards (30MBytes/s or 45MBytes/s) can saturate a USB 2.0 interface, so a [Thunderbolt to] ExpressCard to Memory Card Reader from Sonnet may be a good choice, since there is ample bandwidth under Thunderbolt to handle such traffic.
LaCie Thunderbolt to Storage
Traditional peripheral vendor LaCie offers an external single-ended USB 3.0/Thunderbolt hard drive. It should be noted, there is no daisy-chain off of this drive. This can also be run this drive from a LaCie USB 3.0 ExpressCard, but it requires LaCie drivers and will not work with other USB 3.0 hard disk vendors - the driver was coded to only work with LaCie storage.
[LaCie eSATA Hub, courtesy LaCie]
LaCie Thunderbolt eSATA Hub
LaCie also released a Thunderbolt eSATA Hub, with 2x eSATA connections (to connect to 2x high performance eSATA external drives) and 2x Thunderbolt connectors (to allow daisy-chaining!)
CalDigit Thunderbolt to USB 3.0 Storage
For those users with Thunderbolt and without USB 3.0, Caldigit has an ExpressCard to USB 3.0 generic external storage. For pre-USB 3.0 Mac platforms, drivers are required, but should work with any storage vendor, although not tested against everyone elses storage.
[CalDigit T1 and T2 external dual-thunderbold interface drives, courtesy CalDigit]
CalDigit Thunderbolt to External Storage
Thunderbolt external storage with dual interfaces is essential for daisy-chaining additional components. With the CalDigit T1 & T2, not only is this possible, but drives are removable, for hot-swaping in RAID sets.
Matrox DS-1 Thunderbolt Docking Station
Adding a Thunderbolt Docking Station may solve a lot of connectivity issues for the portable laptop user. The Matrox DS1 Docking Station adds: 1x USB 3.0 port, 2x USB 2.0 ports, DVI or HDMI port, Gigabit Ethernet, Stereo Headphones, and Microphone port. Note, no thunderbolt daisy-chaining on this unit, but with monitor & USB 3.0 - there may not be a need.
Belkin Thunderbolt Docking Station
The Belkin Thunderbolt Docking Station is late to be released, but offers daisy-chaining not available in the early-to-market Matrox unit. With 1x Gigabit Ethernet, 1x 800Mb/s FireWire, 2x Thunderbolt, and 3x USB 3.0 ports - this is an absolutely amazing unit!
[Thunderbolt Devices available circa 2013, courtesy TechWorld]
Thunderbolt Devices in 2013 TechWorld published a slideshow describing Thunderbolt devices due in 2013. Blackmagic has a Standard and High Definition Thunderbolt video capture unit on-tap. G-Technology announced 4 and 8 bay portable RAID enclosures. LaCie announced their Little Big Disk, daisy-chainable Thunderbolt. Apple announced their 27 inch daisy-chainable Thunderbolt monitor. Promise announced 4TB, 6TB, 8TB, and 12TB Thunderbolt RAID units.
[Buffalo Ministation Thunderbolt/USB 3.0 Drive, courtesy PC Magazine]
Buffalo Thunderbolt Hard Drives
Buffalo offers a 500 Gigabyte and 1 Terabyte Drive which is both compatible with Thuderbolt and USB 3.0, but note there is no daisy-chaining on this drive available.
[Western Digital 6TB Thunderbolt dual drive, courtesy MacWorld]
Western Digital Thunderbolt Hard Drives Western Digital offers both a 4 Terabyte and 6 Terabyte form factor dual external thunderbolt drive. Also, there is the WD 2 Terabyte MyBook with dual thunderbolt interface external drive. These drives are both daisy-chain capable.
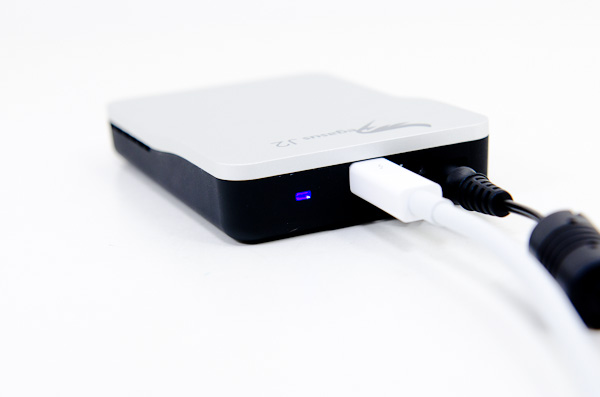
PROMISE Pegasis J2 SSD Thunderbolt Drives
The Pegasis J2 is offered in 2 different sizes by PROMISE: 256 Gigabytes and 512 Gigabytes. The 256 GB solution uses dual 128 GB SSD's, while the 512GB solution uses diak 256 GB SSD's. Note, there is only one thunderbolt port, so there is no daisy-chaining. Also, the power draw of the SSD and RAID controller are so great that full-speed is only possible using an external power adapter.
LaCie Thunderbolt Hard Drives
LaCie is offering 3 types of desktop thunderbolt drives, ranging from: 5400RPM 2TB LittleBigDisk; to the 7200RPM 4TB and 6TB 2big external disks with removable drives; 512 GB and 1 TB SATA III SSD Thunderbolt LittleBigDisk without removable disks. All drives offer two Thunderbolt ports for daisy-chaining.
LaCie Rugged Thunderbolt and USB 3.0 Hard Drives
LaCie is also offering their Rugged portable USB 3.0 / Thunderbolt drives, in a 1 TB disk and 256 GB SSD form factors. Note, there is no daisy-chaining on these drives.
[G-Technology 4TB, 6TB, 8TB G-RAID with Thunderbolt, courtesy MacWorld]
G-Technology G-RAID Thunderbolt
Offered from G-Technology is a dual-thunderbolt port capable G-RAID sytsems in 4 Terabyte, 6 Terabyte, and 8 Terabyte systems. Yes, you can daisy-chain these thunderbolt systems.
Apple Macintosh with USB 3.0 Storage
Thunderbolt storage is not the only game in town. An effective step-down from Thunderbolt is to use USB 3.0. If an Apple Macintosh with native USB 3.0 is unavailable, one of several options are available: PCIe to USB 3.0, ExpressCard to USB 3.0, Thuderbolt Hub, Thunderbolt to ExpressCard to USB 3.0, Thunderbolt to PCIe to USB 3.0. The results will be close to what is illustrated in the above video.
Apple Macintosh with FireWire 800 Storage
USB 3.0 is only slightly faster (5% on a 16 Gigabyte file copy) than FireWire 800 in real-world performance to an external drive. If you need storage today, you can't hold out for Thunderbolt, you don't have USB 3.0 capabilities - FireWire is still a very reasonable path to move forward with. With an inexpensive Thunderbolt to FireWire interface, even newer Apple Macintoshes without FireWire can have robust performing daisy-chain storage using Thunderbolt to FireWire 800 interface.
Conclusions:
With Thunderbolt, formerly low-end and portable systems can now have full storage and various card expansion components available to them, at minimal extra cost. Machines utilizing Thunderbolt will probably start appearing on the LAN's and require additional management in the very near future, as more robust options continue to appear for them.


